Thursday, November 25, 2010

HAPPY THANKSGIVING TO YOU!

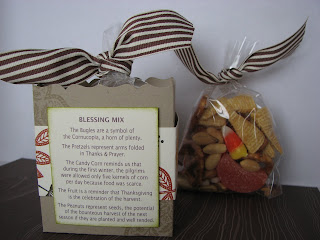
Hello All! I hope you all had a great day today :) I made this fun little box using the Fancy Favor die for the Big Shot and the Day of Gratitude stamp set out of the Holiday Mini.

Here is something I found in the Spokesman-Review a couple of years ago that I clipped and saved and would like to share with you... ENJOY.

Be Thankful (author unknown)

Be thankful that you don't already have everything you desire. If you did, what would there be to look forward to?
Be thankful when you don't know something, for it gives you the opportunity to learn.
Be thankful for the difficult times. During those times you grow.
Be thankful for your limitations, because they give you the opportunity for improvement.
Be thankful for each new challenge, because it will build your strength and character.
Be thankful for your mistakes. They will teach you valuable lessons.
Be thankful when your tired and weary, because it means you've made a difference.

It's easy to be thankful for the good things. A life of rich fulfillment comes to those who are also thankful for the setbacks. Gratitude can turn a negative into a positive.
Find a way to be thankful for your troubles and they can become your blessings.

Kim


Monday, November 22, 2010

Let's make it a Jolly Holiday!

I would like to say Thank you to the ladies who joined me for my Jolly Holiday/Contempo Christmas Stamp a Stack! We made 20 cards using the above mentioned combo and I sent them home with over half a pack of the Jolly Holiday paper to use for cards, scrapbooking the season or tags for Christmas! This paper is so fun! I'll post a photo of the bag decorated with the Jolly Holiday DSP that they took their cards and envelopes home in so check back tomorrow :)

Here is a card I made using small pieces of the Jolly Holiday DSP and the Cute and Curly stamp set on page 149 if the SU! IDB&C. I also used Cherry Cobbler, Old Olive and Very Vanilla cardstock, and a gold Glimmer Brad (Holiday Mini). I ran the Old Olive background piece through the Big Shot using the Perfect Polka Dots embossing folder on page 214. Pretty quick and easy! I hope you like it :)

Sunday, November 14, 2010

Ethan's "Long Fellows" birthday card!

Hello! This is the card that I made for my 14 year old's birthday which is today! I like to keep them fairly simple and hardly ever use ribbon on a boys' card. To jazz it up a bit, I added Pear Pizzazz, Baha Breeze and Daffodil Delight 1 1/4 in. and 1 in. circles behind the red strip and 1/2" strip of DSP. I love this pattern from the Greenhouse Gala DSP and for this card, a little went a "long" way - no pun intended but now I think it's funny :)

This cute turtle is from the Level 2 Hostess set, Long Fellows. You'll be seeing some of them in the posts to come - they are just too cute! The "celebrate you" stamp is from the Party Hearty set which is a great birthday set in the SU! IDB&C. The base of the card is Pear Pizzazz. I colored the birthday turtle with my Certainly Celery and Old Olive markers. His hat is just a small piece of DSP that I liked cut in a triangle. Ethan liked the card :0)


Thursday, November 11, 2010

Contempo Christmas Topnote

Hello! Switching gears to a Christmas card today... Here is a simple one using two images from Contempo Christmas from the Holiday Mini. This is one of the sets that is being offered at 20% off when you buy it in combination with the Jolly Holiday DSP in the SU! IDB&C.

In Early Espresso, I rolled out a "topnote" using the Topnote die for the Big Shot. Then, I ran the topnote through the Big Shot again in the Vintage Wallpaper embossing folder. I scored and then folded it over the Whisper White layer. Then, I stamped the ornament on Whisper White and punched it out with the Ornament punch. I added Dazzling Diamonds to the ornament's tiny spots and then tied a simple not in Cherry Cobbler seam binding and affixed it with a glue dot. The Merry Christmas was stamped in Early Espresso. Layer those on Cherry Cobbler and Old Olive and you're done!

Monday, November 8, 2010

November Stamp Camp

I know, you can't believe it, two posts in two consecutive days? WOW.
I know you're thinking I'm really getting on the ball now but I'm not :) Ha, ha.

Anyway, thought I'd post the photos of this month's stamp camp. Can you tell I'm loving the set, Day of Gratitude? It really is so beautiful and very versatile. I'm not done playing with it yet so hopefully I'll get more posts on here for you to see. This set is in the Holiday Mini Catalog and is available through Jan. 3. You should be able to double click on the photo to get closer up to the cards.

The other sets I used were Contempo Christmas, Tags til Christmas and Sincere Salutations. Please let me know if you have any questions!

Sunday, November 7, 2010

Surprise birthday penguins!


I couldn't wait to make this card for my friend Connie when I saw a similar cute Owl card on a fellow stampers blog! I just knew she would love see the penguins "pop out" of a seemingly ordinary (handmade of course) birthday card!

The penguins are the Stampin' Up! owl punch in black. You clip off the feet and attach pumpkin pie owl feet instead. Then, you snip off the owls ears. I stamped the birthday hats from the Party Heart set and then left a bottom piece of cardstock on it so I could attached it to the back of each penguins head. The pop up parts are 1/2" slits made even spaced apart and then pushed out a bit so you can attache the penguins to them. This card has two layers of More Mustard to disguise the pop up part a bit. I sent this card on but will need to make another and take some close up shots.

The front of the card is pretty explanatory. I used the Day of Gratitude set, the On Your Birthday set for the front and inside sentiments and the polka dot texture folder for the Big Shot.

I've finally got some photos to share, I'll post the stamp camp photos from today, tomorrow - I still need to take a group shot. Time to reorganize from today and then do the same thing for the Wednesday class!

Hope you all had a great weekend! Kim

Tuesday, October 5, 2010

October Stamp Camp photos!


Hello! I know... finally got these up! I will get some of the others up in the next few days - just catching up. We had a great time and I'm glad everyone liked the projects!

Thank you to the Simple and Sincere blog for the card I cased with the Greenhouse Gala and the red 1/4 in. grosgrain - love that card, what a great way to showcase all of the beautiful Stampin' Up! DSP or just use your printed scraps.

Also, frenchiestamps.com for the great owl votive idea - what a fun and easy decor project!!! I'll have to post the other two I made for those that couldn't make stamp camp to see them.

You'll have to visit those blogs for some fun ideas - there are so many talented ladies out there!

Last but not least, Stampin' Up! released even more Clearance Items in the Clearance Rack just today! I know you already spent your "fun" budget at Stamp Camp, but I would not be a friend if I didn't mention it for you to decide! (I couldn't order these on the same Stamp Camp order anyway) If interested in those items, order off my website for the best price (look for the link on the left) or email or call me (I get the same price but can at least split shipping). All items are WHILE SUPPLIES LAST and some things will move quicker than others. These items cannot be combined with the 20% specials I told you about because the clearance rack best prices are until 10/16 only and the 20% off specials are good beginning 10/19.

Okay, enough for now, email or call me if you have questions on anything!

Kim


Tuesday, September 28, 2010

Thankful for Tuesday...

Hello... Falling Leaves with a little some Bright Blessings mixed in! Here in Spokane it is as far from fall as we can get! Here is a twist on a card I'm doing for Stamp Camp this Sunday. I turned this one on it's side and added some wide striped grosgrain. Love these colors!! Okay, I guess there aren't many I don't love... Card stocks used here are Riding Hood Red, Whisper White and Early Espresso. I inked up the Bright Blessings wheel with versamark, rolled it on and then sprinkled clear embossing powder over it and heated it up. Of course, the leaves are popped with with dimensionals and so is the sentiment.

Ink colors are Pumpkin Pie, Daffodil Delight, Riding Hood Red and Early Espresso for the "grateful." ENJOY!

Friday, September 24, 2010

Happy Friday!

Hello Friends! A quick post before I head out to the Greasy Pig...

Here's a sunny card to welcome Fall! I wanted to make a simple card with a sunflower using the Greenhouse Gala paper and settled on the daisy die for the Big Shot. I'm not using this card for Stamp Camp because I thought it was too similar to the one from a past stamp camp (with the vase) so instead it is just for inspiration!

This card uses Tangerine Tango for the base, Greenhouse Gala for the bottom piece and of course for the sunflower. I added texture to the chocolate chip middle using the dotted texture plate for the big shot and of course had to pop it up with dimensionals. The sentiment is from a great new set called "Word Play." Oh yes, the background paper is textured Baha Breeze.

Enjoy and have a great weekend! Kim

Friday, September 10, 2010

Greenhouse Gala Birthday!

I am itching to make more samples with this DSP and will definitely be showcasing it in my Sept. Stamp Camp! Oh, how do I love this set and the colors? Let me count the ways.... Love it, love it, love it!

Look how simple this card is! Of course, I have to include my one of my favorite birthday sentiments from "On Your Birthday." Are you tired of seeing it yet? It just says it all! Besides the DSP, the cardstock colors I used were Real Red, Chocolate Chip and Whisper White with markers of the same to color the sentiment. I also used Old Olive satin ribbon.

3rd day of the boys back at school, I'm catching up with housework and paperwork... should have time to play soon! Happy Friday everyone!

Sunday, September 5, 2010

Summer Birthdays!

Hello! Nope, not doing much for Labor Day this year... no lake, camping, big BBQs. We did get to go to one but did not host. Instead, he-who-brings-in-the-bacon is working two days so the boys and I get to catch up with last minute school shopping and a football practice on Labor Day!

You'd think with not a bunch going on I could get some new cards up here... don't forget I have 3 boys that I love to hang around! ... how about a fun birthday card with now retired paper? I love this card and paper!

I plan to stay up late tonite and make something new so we'll see what I post this week!
Meanwhile, this was the "Island Oasis" paper that was in the Summer Mini along with one of my favorite birthday sentiments from the "On Your Birthday" set that is still in the big catalog.
Unfortunately, the matching hawaiian flowers are from the set that matches the paper. Cute stuff and they were easy to trim too! ENJOY! Hope you are enjoying whatever you like to do on a 3-day weekend!

Wednesday, September 1, 2010

The versatile Upsy Daisy...

Wow, are my titles catchy or what (not)! Here's a set I go to quite a bit - Upsy Daisy. Love this set! Here, I used it for a Sympathy card for a friend. I put Baha Breeze and Not Quite Navy pads together and simply rolled the brayer in both colors at the same time. Then, I rolled the brayer over the stamp layed out on the table to ink it up. I had pre-cut a Top Note with the Sizzix so I stamped it right on. The brayer is soooo easy to use! I'm sure there are a lot of way to use it but this is pretty much all I know so far :)

I trimmed the white piece of Top Note and then layered it on the Not Quite Navy piece. The set comes with three sentiments which is one of the reasons this set is so versatile! I've also used it for Happy Birthday and just Thinking of You. I'm sure you could think of more. It's easy to jazz up or tone down. It's hard to see but I also embossed the greeting in Chocolate Chip craft with clear emboss. I believe the jumbo eyelet is in pewter and the base paper is Baha Breeze.

The DSP I put behind is from the new Greenhouse Gala. LOVE this paper! I need to get going on making some samples to post with it. For the meanwhile, I just covet and drool over it :)
It was all I could do to cut off the piece for this card - LOL! I know you paper lovers are the same!

Thursday, August 26, 2010

Fall Weddings?

Fifth Avenue is such an easy set to use for so many occasions! I used it here with one of the sentiments from the new Word Play set available in the new Idea Book & Catalog for a wedding card. Add Dazzling Diamonds to the diamond and done. Colors used: Soft Suede, So Saffron and Old Olive. The ribbons used are the 5/8" Whisper White organza and the 5/8" Satin Old Olive.

Tuesday, August 24, 2010

Elements of Style Anniversary

Wow, I just realized I am not good at coming up with catchy titles! Maybe I can blame it on that fact that I'm all done with today and have no creativity left!

This card was fun to make. Once again, I love the toile look of this stamp set! Simply basic black on white. Stamp and then cut evenly to split the image. Colors used were Riding Hood Red, Basic Black and Whisper White. One more thing, you can't see it but I also ran the whisper white through a texture plate. Looks better in person! The "Happy Anniversary" is from Teeny Tiny Wishes. Ribbon is black satin. Quick and easy!

Saturday, August 21, 2010

Elements of Style


Hello! Well I had a different card to share today but I couldn't get it rotated so we'll go with this one :)

I just love this set! When the largest image I used here is used to make a background it reminds me of toile fabric. Here I stamped it in River Rock on Whisper White. Then, I cut it three time at 1.25 inch intervals and adhered it to River Rock cardstock. I layered this cardstock onto Riding Hood Red and then onto a Whisper White card base. Then I stamped the hummingbird in Riding Hood Red and cut him out to add him onto that large scallop with Stampin' Dimensionals, used them for the scallop as well. Add simple bow of Chocolate Chip satin and there you have it - a pretty simple card! I hope you like it :)


Friday, August 20, 2010

One More Awash...


Melon Mambo, Old Olive and Whisper White - great colors that work so nicely together! Another great card that I didn't make! I should have shared this one long ago. I've got more to share but all summer I've been using up retired DSP and some retired sets I'm having a hard time letting go of so not much I have to share is with current product. I'll throw those in here and there just for some inspiration!
Meanwhile, this is a card my friend Kerri made for me. I just love it! Once again, two step stampin' using Awash with Flowers. The only retired products here are the Melon Mambo polka dot ribbon (though I do have one ribbon sampler left if you're interested-look on the side bar) and the DSP which I believe is from the retired Sweet Pea paper pad but I'm not sure.So glad this set is in the new catalog!

Thursday, August 19, 2010

Lu's Thank You!

Look at this sweet card from my friend Lu! The colors are retired but you could these easily using your favorite colors. This is a good example of two step, more like three step stamping. This set, Awash with Flowers, has 18 images of which half are the outline and the other are the fill in. Lu stamped the filled in part twice to get the shadow effect then added some Dazzling Diamonds to the top... the finishing touch! :) Simply beautiful!

Wednesday, August 18, 2010

Tropical Party!

Do two bad photos make for a good post? Hey, it's better than nothing right? These two went really wrong! The first one is terribly out of focus and the other, too dark and for some reason at the wrong angle and I can't figure out how to fix it - sigh... I put the sideways photo in so you could see the detail better.

The goal for this card was to make a fun, and again, not too feminine Birthday Card since it was for my sisters step brothers 30th birthday which was actually in Hawaii! I was so excited to use this set! I think the coconut is "sweet!" I just stamped it in Soft Suede ink, colored in the umbrella with Stampin' Write markers, cut it out and popped it up with Stampin' Dimensionals.

The rest of the images in this set are pretty versatile. You can see the palm frond used as a background on the Tempting Turquoise base and of course the coconut trees on the front. It also comes with two great hibiscus-type flowers! This is a set that will "retire" as of Aug. 31 when the mini catalog switches from Summer to Holiday.

The coordinating DSP, Island Oasis, is great as well using the colors: Tempting Turquoise, Pumpkin Pie, So Saffron, Rose Red and Old Olive. :) Yum!! What a combination!!

Another note: the "It's Your Day... ENJOY" sentiment popped up on the oval on the front and the "Let's Celebrate" stamped in between the palm fronds on the base of the card are both from the "On Your Birthday" stamp set in the big Stampin' Up! Idea Book and Catalog.


Sunday, August 15, 2010

Okay, so I had to change it!


Hey! I've already stayed up this late trying to catch up right? Thought I'd post the birthday card I made for one of my nephews in June! Ignore everything retired! At least it's an idea right?

It's been so long I almost forgot my login ID :)

I was trying to keep this one simple and not make it too girly! It didn't look too girly in person-I think in the photo the Ruby Red looks too pink.

Either way... wish me luck this week and if you have anything Stampin' Up! you'd like to share please do!

Have a great week - Kim


Sunday, May 9, 2010

Just a tease! Happy Mother's Day!


Hello and Happy Mother's Day! Awash with Flowers was the set available for the month of April only. Although it isn't available now, it will be in the 2010 - 2011 Stampin' Up! Ideas Book & Catalog which debuts July 1. I'm posting these for inspiration and for my couple of customers that purchased it in April. Aren't they gorgeous?? I can't take credit for these - we made them at a demo meeting last month and I'm not sure where the original card came from. I know I've seen similar designs so it's hard to pin point. Simple and beautiful!! I won't go into too much detail so if you need any additional please let me know!

This is a two step stamp set and it is very easy to use. We used outlined in Basic Black, Old Olive and filled in with Crushed Curry. The jewelry tag was used here on the second card and the sentiment is from the birthday set in the big catalog.

I hope you have a great day! Kim

Monday, May 3, 2010

Quilt Purse stitched by Stephanie

I know! I need to get back in the swing of things! We've been soooo busy lately - sheesh.

I haven't been able to take photos of the latest cards I wanted to share so I thought I'd share this cute bag I forgot to post in March. This is a "quilt" bag by a fellow demonstrator Stephanie for her friend Sherry (I think I got that right! ... Sherry also made a pink themed one for Stephanie) Sherry brought it to the Big Stampin' Event and I had to get a photo - I really need to make one of these! I loved the colors on this - would be cute as a bag or to borrow the colors for a fun card or scrapbook page! Looks like vanilla or white with Tempting Turqoise, Taken with Teal, Old Olive, Certainly Celery and Chocolate Chip. LOVE IT!

Basically, this bag was made using fabric die cut using the Big Shot and the Clear Square Scallop die. I hear they take a couple of hours. Not bad! It would probably take me twice the time though :D

Looks closely and you'll see a matching flower brooch. It was die cut using the Flower Fold die - it is similar to the one in the post for the Women's Tea.

Enjoy! I'll get some new cards on here tomorrow :) I've got an order of new stuff coming in later this week!

Wednesday, April 28, 2010

Flowers for you!

This watering can with flowers just puts a smile on my face so I hope it does for you too! Some of you made this at stamp camp but I wanted to share this with those who couldn't make it.

I got these pails for $1 at Michael's and couldn't wait to use them! The scallop hanging off of the ribbon comes with the Birds and Blooms 4 pack sizzlet set for the Big Shot. The "be happy" (retired) stamped in Bermuda Bay in the center is punched out with the 1" circle so I guess it makes it about a 1 3/8" scallop. Perfect for the pail! The sizzlet also punches out about a 3/4" scallop.

The set I used for the flower centers is "Good Friend" out of the Stampin' Up! Idea Book & Catalog. I used chocolate chip and certainly celery inks. The certainly celery centers are also dazzled with heat and stick powder and Iridiscent Ice and then were punched out with the 1" punch. The chocolate chip centers were punched with the 1 1/4" punch. Of course, all are popped up with Stampin' Dimensionals. The center of the middle flower was made with the 9.95 Polka Dot background stamp that is in the Occasions Mini (good until Fri, Apr. 30) and white craft ink on Bermuda Bay cardstock and punched out with the 1" punch. (Wow, run on sentence!) Then, I added a Clear Rhinestone to the center.

The flowers themselves were the Large Flower punch in Bermuda Bay, Melon Mambo and Pumpkin Pie card stock. The leaves were trimmed off of Old Olive punch outs of the Five Flower punch and added on with the mini-glue dots. The "stems" are 6" kabob sticks.

I put a small 1" square piece of floral foam in the pot to hold the sticks where they should be and then backfilled with decorative rocks from Michael's. This would be a fun gift for anyone but especially for someone who can't have real flowers!

ENJOY!

Monday, April 26, 2010

Bowling Favors


Good Monday Morning! Wanted to share these fun favors a customer of mine shared at the Tuesday stamp camp. Lu was in charge of table favors for her bowling groups end of the year party and came over looking for ideas. She ended up using the pizza box along with a 3 x 3 card inside and some candy (of course). No two boxes were the same and although she used some of her beloved "Cottage Wall" DSP she also used a lot of left over papers from retired paper packs so the project wasn't too costly.

Products she used were:

Oval All stamp set for the "just for you"

The cute circle image in the centers is from a retired stamp set that I'm blanking on right now but I know it is a set that has 6 different "snow flakes" in it. I used them as backgrounds for my Christmas cards one year!

Large Flower punch
Scallop circle punch
Oval scallop
3/4 in. circle punch
1 3/8 circle punch
brads for the centers

Cardstock used were Old Olive, Kiwi Kiss (retired), Rich Razzleberry and Pale Plum.

I know she had her son print out the bowling images and the wording on the inside of the 3x3s.
The favors were a hit with the bowling league! Nice job Lu!


Thursday, April 22, 2010

Very Thankful Turtle

Hello! Sorry it's been a couple of days... busy week!

Wanted to share another idea using Stampin' Up!'s Ronald McDonald House set. $2 of the purchase of this set goes to the Ronald McDonald House through June 30. Remember we raised $235 with ticket sales for the Raffle Basket at the Big Stampin' Event? Well, this is the card I made to put the donation in.

As you can see, this one is pretty simple except for the watercoloring and that would depend on whether or not you like to do that! You could always paper pierce the turtle and his wagon too.
I watercolored the image with Certainly Celery, Old Olive, Real Red, Summer Sun and Basic Gray for the wheels. The paper is from the Tall Tales DSP, Chocolate Chip 5/8 grosgrain ribbon and the cute "little something" image is from the set, "Matchbook Messages."

Tomorrow I will share a cute favor box and matching card that one of my customer's brought to share with me at stamp camp this Tuesday... Have a great day! Kim

Monday, April 19, 2010

Simple Trendy Trees


Good Morning! Hope everyone had a great weekend!!

Here is a card I came up with for Stamp Camp using one of the sets I love that happens to be on sale this month (20% off - $14.36). I love these trees because you can do so much with them plus I love that it comes with the swirl image and the two sentiments. Using "teeny tiny wishes stamp set" you could make this card go almost any way as well!

Bashful blue paper and ink were used for the base. The DSP is from the Write Stuff Specialty pack of paper which is at the end of the DSP on page 163 of the Stampin' Up! Idea Book & Catalog. This pack comes with fun die cuts along with 6 sheets of double sided papers in Soft Suede, Old Olive, Ruby Red and Crushed Curry - love the combo!

The colors I used for the trees were pink passion (reminds me of a flowering cherry!), old olive, certainly celery and chocolate chip. Also, the brad is a white Jumbo Brad from the 5/16" Neutrals Assortment on page 179. Punch for the sentiment is the Modern Label.

Click on the April Specials link on the top right to see the other sets that are on sale!

Have a great day! Kim


Friday, April 16, 2010

CONAN TONITE! ... and a Card remake!


Okay so I posted a similar card last month... I love the simple layout and really love the flower made with the eyelet punch and the crimper. I also wanted to use some paper and a stamp set that will no longer be available after April 30. Get them while you can!

I just love the colors on this card! Old Olive, Real Red and White - crisp and clean! This would also make a great Mother's Day card if you just change out the sentiment on the Wide Oval punch. Can you see that I stamped off the larger flower image (Certainly Celery) under the Chocolate Chip "friend"? This set matches the Specialty DSP I used which is available in the current Occasions Mini through April 30.

Also used here were a Build-a-Brad, the Small Oval punch in Old Olive folded in half and then run through the crimper. Trim it to make it look more like it has a "tip" of a leaf. I used a 1 3/8 circle of the sticky sheets to wrap the "petals" around to make it look like a flower - make sense? We'll be making this card at Saturday and Tuesdays stamp camp! Fun!

Enjoy your weekend! I'm so excited I can hardly contain myself... we're off to see Conan O'Brien live tonite for his LEGALLY PROHIBITED FROM BEING FUNNY ON TELEVSION TOUR!

Ta ta for now...


Thursday, April 15, 2010

Simple Wishes...

Wow really? It's supposed to be up to 75 degrees here today through Saturday. That's a bit different than the freezing winds we had last week! Seriously, standing at a track meet so cold even the extra blanket weren't doing the trick! I guess it's what we call APRIL! Crazy! Not that I'm complaining... :)

Wouldn't this card be great for a number of occasions? A Hello, Birthday, Thinking of You, Sympathy, Wedding Congrats - this is an all around card and it was very simple to make. Yes, you would need the Big Shot for this exact card - I know I use the Big Shot a lot because I LOVE it and it makes things so easy!

However, you could find ways to make it without. You could use the butterfly punch instead of the Beautiful Butterflies die for a similar effect. I cut out two butterflies, one in a sheet of DSP from Thoroughly Modern DSP and the other in the coordinating Bermuda Bay. I put them together with just a Clear Rhinestone and a tiny bit of adhesive under the middle so it didn't move around but I would still flip up the wings.

For the embossing I used SU!s Textured Impressions Elegant Bouquet embossing folder which embosses right in the corner. You could take a pretty swirl or random flower image and stamp it in a very light color or even a stamped off gray or sahara sand or something so it's there but not very bold. Hmmm... I'll have to try that! Off to a busy day!

Tuesday, April 13, 2010

Soft-serve Sweet Scoop sneak peak :)

Yummy... Reminds me of a trip to McDonald's on a hot summer day or after a football game!
This is the set that I used a few days ago that will be available with the new mini on May 1st.

Pretty simple to make! I stamped the cake cone in So Saffron and then stamped the "dip" in Chocolate Chip craft, sprinkled on regular old embossing powder and heat set it. The DSP used is from the great DSP pack that I'm loving from the current Occasions Mini, Sweet Pea DSP. I love all of the paper in this pack and it is so varied I'm surprised I love it all! Those are brads out of the Soft Subtles brads collection that you see on each end there. I textured the Certainly Celery piece with the Perfect Polka dots embossing folder and then put it all on a Whisper White base. I did use Stampin' dimensionals to raise up the DSP that is cut using the Top Note Die and the Big Shot (the biggest piece of pink swirled paper).

Quick and fun birthday card that could also be a hello or let's go for ice cream kind of card! It would also be great for those summer scrapbook pages :) Oh yes, the "happy birthday" is from a set that is good to have, "Teeny Tiny Wishes." Lots of great words to choose from.

ENJOY!

Monday, April 12, 2010

Women's Tea Tables


Happy Monday! Thought I'd share some creations from Kelly! Every year she comes up with a new theme and color scheme for the Women's Tea at Redeemer. This year she used the Flower Folds die, Shades of Spring DSP from the Occasions mini and the "Flight of the Butterfly" set to create the tables. Beautiful! Although I'm there to bounce ideas off of she generally makes everything herself for 60 ladies! She needed no help this year- crazy woman or woman with a Servant's Heart? Maybe a bit of both :)

Anyway, she made the napkins holders using the five flower star punch, the menu uses the Flower Folds die for the flower, the stamp set and the border punch from expired SAB catalog (no worries-it will also be in the new catalog debuting June 30). The brooch she made for each lady (how do you spell that?) uses coordinating fabric and also the Flower Folds die with a rhinestone brad in the center and a pin glued to the backside. We also had these for the Big Stampin' Event!

In the photo with the girls (don't they look lovely? there was not a cold tea pot in the house!) that were our helpers you can see the "real" flowers in the centerpiece. She stuck more flowers in the bucket made with the Flower Folds die and a tea light also-everyone got to take one of those home as well! Everyone had a great time thanks to Kelly and her big heart :)

Thursday, April 8, 2010

Trendy Trees 3x3

Quick and simple! I'm tired so I'll be brief :)

Trendy Trees stamp set
Ink Colors: Pink Passion, Chocolate Chip and Old Olive.
Papers: Old Olive, Chocolate Chip, Sweet Pea Designer Paper Pack
1/4 in. Old Olive Grosgrain ribbon

More this weekend! Thanks for checking in :)

Wednesday, April 7, 2010

Sweet Scoops birthday!

Hello All! Here is a sneak peek of a card I made for a swap that I have tomorrow using the new "Sweet Scoops" set that will be available in the new Mini that will be available May 1st! Cardstock Colors I used on this were Melon Mambo, Chocolate Chip and Whisper White.
Ink colors are: Melon Mambo, So Saffron, Bashful Blue (I think!) and Chocolate Chip.

Although this set looks really cute when you cut out the ice cream scoops individually and layer them, I really wanted to make a simple card so I just stamped them right on top of the other and I think it came out great! The "sprinkles" you see on the base of the card are from the set and so is the "Have a sweet celebration." The "Happy Birthday" you see on the jewelry tag punch (which is available in the current mini) is from the set Teeny Tiny wishes. I inked up each word with a marker and punched them out then tied them on with hemp. The punch I used is the one that was available in the now gone SAB... I hear it will be available in the new catalog that debuts June 30 along with the corner punch that matches it.

I don't have much time to elaborate but if you're curious... click on my Stampin' Up! website link for some changes in the Stampin' Up! color lineup! Yes, some are GOING but the news is that some of the old In-Colors are RETURNING! One thing I will say that surprises me... they did not bring back Kiwi Kiss!? Why not? I'll try to positive, I'm glad Wild Wasabi is returning because I just love that color but why not bring back Kiwi Kiss? Sigh... until tomorrow....

Saturday, April 3, 2010

Sesame Birthday cards!

HAPPY BIRTHDAY TYLER AND KOLE!!!
Needed to make a couple of cards for the little cousins! I have always loved Sesame Street growing up in the 70s so I was excited when I saw ideas for making these little heads awhile back on splitcoast stampers! I made these into spinner cards that I hope the boys will have fun with! There is a tutorial for these on splitcoast, if you can't find it please let me know. The technique uses the word window punch, two pennies and stampin' dimensionals. I realize the alphabet stamp set and the party roller are retired so while you can't duplicate this card exactly, you can certainly come up with your own using the template.

Punches used for the bird bird and cookie monster were: 1/4" circle, 1/2" circle, 1" circle, small oval and scallop punch.

Coming soon! A card using current supplies...

Thursday, April 1, 2010

Trendy Trees Manly Card

First of all, I'm sorry for the quality of this photo! My stamping table was too cluttered so I had to take this photo on the counter in the kitchen.

I needed to make a birthday card for my Dad and this is what I came up with. I wanted to use the different tree in the set but misplaced the trunk of the tree in my mess (I found it the next day-whew!) because my Dad likes the Honey Locust. I will need to make another now that I found the trunk. Anyway, this card uses the Trendy Trees set that is on sale 20% off for $14.36 wood mount only. It's a great set! I will be posting more with this set soon.

This card uses Garden Green and Chocolate Chip cardstock with an older Garden Green DSP from a hostess 6x6 Patterns Pack. The Modern Label punched piece is Crushed Curry. I love this simple layout and hope you do too!

Wednesday, March 31, 2010

Ronald McDonald House Raffle


Hello again! I promise I will get some card ideas on here tomorrow or maybe even later this afternoon! Meanwhile... here is some "eye" candy! You should be able to click on the photo to view the items a bit closer. On March 6 at the Big Stampin' Event we held a raffle to benefit the Ronald McDonald House here in Spokane. These are all the goodies we collected for the basket... some hand made, like a 12 month calendar, notebook and pen, the rest either stamp sets or ribbon. The basket of course included the "Very Thankful" stamp set that is on the back page of the Stampin' Up! Idea Book & Catalog (IDBC). Every year, Stampin' Up! dedicates $2 of the proceeds of a chosen stamp set to donate to Ronald McDonald house nationally. This year, that stamp set was "Very Thankful." It is $14.95 in the big catalog through June 30.

We were excited to raise $238 through ticket sales for this raffle basket! In all our excitement and craziness of the event we completely forgot to get a photo of the winner. One of Sharon's gals was the lucky winner! We did have a lot of door prizes and an early bird prize so I'm glad to say that I know some of my gals won a few of those fun things!

Hope you're off to a great day!
Kim

Saturday, March 27, 2010

BSE Lattice card

Been a crazy busy week so I haven't made anything new... I've decided to post another card from the Big Stampin' Event because I am determined to post regularly. I know those that came to the event have made this so bear with me. I'll be making some new cards today! We get to attend a double Eagle Court of Honor (brothers) this afternoon so I'll be making those two cards and hopefully a few extra!

I really love this lattice card, it definitely has some steps to it but once you get it down I feel the end result is beautiful! This is really an easel card turned sideways. I know this isn't a great photo so I hope you can picture that. I took this photo when I was filming our "tips and tricks" videos so I didn't get a great view of it and it may be hard to understand if you haven't seen one of these cards before. Basically, the left side you see, folds right over the right and there is a hole under "with all my heart" so that it also fits over the "thank you" when it's folded up.
That probably didn't make any sense at all! I'll have this and the other cards at our upcoming stamping event for you to see - which I'm planning for the first week of April.

Anyway, we used the Lattice die in a unique way-love this technique! I will have to come up with another card to have at a stamping event so you can see just how we did this. Basically, you cut the paper to be die cut at 3 1/4 x 5 (I'll have to double check that measurement). You score it on the 5" side at 3 1/4 and fold it. Lay it over the die cut so that the scored piece is just inside of the end of the die so that it doesn't get cut all the way (make sense)? Then, after you roll it through the Big Shot, you'll be able to unfold it and then clip off the excess - now you have a larger piece than the die cut was intended for. I will take some better photos today and post a step by step views plus a better angle of the card folding a little later.

The texture for the ruby red cs was done with the Finial Press embossing folder. You'll notice the scallops are a little larger than the punch... These are from the long Pennant die. You get scallops in addition to the two pennants. Other punches used here were the 1 3/4 in. circle punch, Modern Label, Word Window, small Heart punch from the Occasions mini, Trio Flower punch for the small flowers and a 1/4 in. punch for the middles.

Enjoy your Saturday!

Thursday, March 25, 2010

More coaster calendars!


I just love these calendars for small gifts! Who doesn't need a mini desk calendar with post it notes on the back? Okay, my friend Lisa doesn't but there are so many others who do! Anyway, I made two more to go with my auction donations for the Spokane Valley Fire Fighter's Cask & Keg Auction that will benefit SVFF Benevolence Association. The Cask & Keg is Friday, March 26.

The papers I used for both calendars were from the Sweet Pea DSP pack in the Occasions Mini. There are so many awesome papers in that paper pad! The coordinating papers were Rose Red, Old Olive for the left one and Old Olive and Pretty in Pink for the right one. Ribbons were 5/8 grosgrain... Chocolate Chip and Old Olive. I used the Large pewter eyelets from the SU! catalog and attached them to the coasters with the Crop-a-dile. Have a great day!

Wednesday, March 24, 2010

Big Stampin' Event: Two more projects


Hello again! Here is the jar everyone received and the card purse we made to hold the cards and envelopes from the Big Stampin' Event...

Card purse first.... The "lid" is one of the pieces out of the Write Stuff Specialty Pack of DSP. I love the colors featured in this pack of papers: Ruby Red, Kraft, Soft Suede, Old Olive and Crushed Curry. It includes those colors as DSP and 3 sheets of thicker cs that have pieces you can punch out and use like the one for the purse.

On this project, the tags on the front are layers of one of the tags you get on the matchbox die for the Big Shot. We ran both sides of the "purse" through the Big Shot using the Perfect Polka Dots texture plate as well. The flower was made by punching six flowers out of the DSP in the package with the new XL Flower punch available in the Occasions mini. You crumple up each flower and then unfold it and alternate color sides. Then, you can put a brad or what we used here, a Build-a-Brad using a 1/2" circle of coordinating paper on it to make the middle. A fun flower to make and pretty easy!

We also made one using the scallop circle punch for the jar you see on the top of the post.

Have a great day! Kim


Tuesday, March 23, 2010

Very Thankful Peacock

Hello! Here's a quick, simple card using the Ronald McDonald house Very Thankful set. I saw a similar idea somewhere and tweaked it. It was so long ago I can't remember where I saw it to give credit! I used Tempting Turquoise and some matching DSP from the Pink Flamingo DSP again. The white piece is embossed using the Perfect Polka Dot embossing folder through the Big Shot. I stamped the peacock in Rich Razzleberry, punched it out with the 1 3/4 and then popped it up on dimensionals. The ribbon is the organza out of the big catalog. Oh yes, I also used the corner rounder punch on the corners. Easy Peasy!

Off to a busy day! I hope you enjoy yours! Also, Happy Birthday to Ryan and Heidi!

Saturday, March 20, 2010

Bookmark Card

Hello! I totally forgot about posting some of the projects from the Big Stampin' Event! One of our projects was this bookmark card using the slit punch and the petal card die. Since we actually filmed a short "tips and tricks" video on this card that we played at the event I will attempt to add it to explain some of the techniques. Don't you love the slit punch technique to add the large two color scallop edge? The paper colors used on this card were Kraft, Ruby Red and Whisper White along with a small punch out from the Write Stuff Specialty Paper pack in the SU! IB & C. We used about a 1/3 of each kit for each participant and the 7 other projects.
The flowers on the bookmark are just stamped in Ruby craft and embossed with Iridescent Ice and cut out and attached with Stampin' Dimensionals. We added the "Friend" on to the actual project (omitted the "my") by inking up the just what we wanted on the image from this stamp set, With All My Heart, using the Chocolate Chip. Let's see if the video works here... by the way, I recorded and fellow demo Stephanie is the voice!

Okay, I had to step away because it was taking too long to load and now it looks as if it did not work! I'll have to attempt to save it in a smaller version. I'll work on that later today or this weekend - meanwhile, just the card!


Friday, March 19, 2010

"Manly" Thank You!

Ahhh... us cardmakers always struggle with coming up with a card with little bling and no flowers for the men in life! I never add ribbon to a "manly" card which is difficult to do! What do you think of this one? This was for the pastor of the church (and his secretary) where we held the Big Stampin' Event! They were all so helpful to us :)

I used Whisper White, Chocolate Chip and Pumpkin Pie cs. The DSP is from the Sweet Pea DSP paper pack out of the Occasions Mini - lots of great papers in there! There are the same sheet, just opposite sides that match! The set I used was "For All You Do," out of the Idea Book & Catalog... I just inked up only the words I wanted to use with my Chocolate Chip stampin' write marker and punched it out with the 1 3/4 in. circle punch. The "thank you" is from the same set and I punched it out with the "modern label" punch and added two brads from the Vintage Brads collection. The arrow came from the "My Way" punch - it also have two little arrows that punch out with it.

Oh yes, you'll notice some stamping on the very bottom of the chocolate chip piece. The "For All You Do" set also comes with the polka dot stamp set I used. I just repeated it along the bottom. Easy! Love that stamp set :)

I like it anyway! Would make a fun birthday card just changing around sentiments too!
Have a good day and weekend!

Thursday, March 18, 2010

Simple but beautiful!

Don't you love the colors on this card? First of all, anything with Chocolate Chip in it has to be a winner! Do I make cards without that color? They are few and far between!

This time, I paired it with Crushed Curry as the base and a big piece of DSP out of the Pink Flamingo pack of DSP from the SU! Idea Book & Catalog. I love the striking colors in that pack of paper. How easy is that? I got the scalloped top that looks like a valance by cutting the chocolate chip cs longer than normal, scoring it where I normally would have cut it and then folded it over and added the scallop edge with the Scallop Edge punch. In this case, my CC piece was 4 1/8 x 6 1/2 before I scalloped it. Then, I just tied a piece of the Chocolate Chip satin into a knot around it. All of the Satin ribbons are available in the Occasions mini.

The sentiment was easy to do. I used Vintage Labels which is one of the free sets available during Sale-A-Bration in Chocolate Chip and Real Red. (This set also has a "best wishes" and a "thank you" that each fit inside all of the different "framed" stamps. It is available in both wood mount or clear mount.) I punched out the frame using the Large Oval punch and then the layers underneath are two chocolate chip pieces were punched out of chocolate chip using the Scallop Oval punch. I used Real Red brads on the ends and then popped the whole piece up with Stampin' Dimensionals.

Another beautiful day in Spokane! Amazing how our winter is so opposite from just last year. Record snowfall last year, record no-snow fall this year. I guess it all stayed East this year!

Have a great day!

Wednesday, March 17, 2010

Make your own DSP!


What I like about this technique is that it brings back a little stampin' to your projects. Have you noticed that there are so many cute DSPs and textures out there that sometime our cards have hardly been stamped at all? Now don't get me wrong - I absolutely LOVE using DSPs who can resist with all the matching colors and designs you get in each pack? In fact, tomorrow's post used a huge piece of DSP from "Pink Flamingo"-it's yummy! I'm just saying every now and then it's fun to return to actually stamping! If you came to the Big Stampin' Event then this will look famililar but with different colors.

I used the "With All My Heart" stamp set and inked up the various images with Bashful Blue, Real Red and Certainly Celery. Then, I sponged in the white areas with Certainly Celery and Bashful Blue. Lastly, I spritzed it with Champagne Mist shimmer paint in a mini spray bottle.
By the way, the shimmer paints from the Holiday mini are still available! I might sneak in a post about how I've been using that.

Anyway, then I stamped a red flower from the set on a separate piece of paper and then punched it out using the trio flower punch (it fits perfect) and attached it to the card using a stampin' dimensional. The rest if pretty self explanatory... I used the Scallop Trim punch on the Certainly Celery cs for one of the layers. This is the punch you can get free as a Sale-A-Bration item when you purchase $50 in Stampin' Up! before March 31. You can also purchase the matching corner punch in the Occasions mini that ends on March 31 as well. Together they are oh so sweet! Last but not least, the sentiment is from the All Holidays stamp set in the Stampin Up! Idea Book & Catalog. I use this set and sentiment a lot! Don't forget to thank God for your "dear kind and wonderful friends!"

Have a great day! Kim

In case you missed these...

Blog Widget by LinkWithin